

Tips for Seeding Success
go.ncsu.edu/readext?453677
en Español / em Português
El inglés es el idioma de control de esta página. En la medida en que haya algún conflicto entre la traducción al inglés y la traducción, el inglés prevalece.
Al hacer clic en el enlace de traducción se activa un servicio de traducción gratuito para convertir la página al español. Al igual que con cualquier traducción por Internet, la conversión no es sensible al contexto y puede que no traduzca el texto en su significado original. NC State Extension no garantiza la exactitud del texto traducido. Por favor, tenga en cuenta que algunas aplicaciones y/o servicios pueden no funcionar como se espera cuando se traducen.
Português
Inglês é o idioma de controle desta página. Na medida que haja algum conflito entre o texto original em Inglês e a tradução, o Inglês prevalece.
Ao clicar no link de tradução, um serviço gratuito de tradução será ativado para converter a página para o Português. Como em qualquer tradução pela internet, a conversão não é sensivel ao contexto e pode não ocorrer a tradução para o significado orginal. O serviço de Extensão da Carolina do Norte (NC State Extension) não garante a exatidão do texto traduzido. Por favor, observe que algumas funções ou serviços podem não funcionar como esperado após a tradução.
English
English is the controlling language of this page. To the extent there is any conflict between the English text and the translation, English controls.
Clicking on the translation link activates a free translation service to convert the page to Spanish. As with any Internet translation, the conversion is not context-sensitive and may not translate the text to its original meaning. NC State Extension does not guarantee the accuracy of the translated text. Please note that some applications and/or services may not function as expected when translated.
Collapse ▲Annual plants for home gardens are commonly started from seeds to encourage early flowering or fruit production. For the most part, it is a straightforward process. However, there are important details that should not be overlooked when going about starting these plants.
The first step is to choose seeds that have been stored properly or are not too old. Seeds can remain viable for years, but viability varies based on storage conditions, age, and seed physiology. If you are uncertain about old seed, try performing a simple germination test. Wrap seeds in wet paper towel, keeping them very moist, and count how many germinate after several days. This will not work with some pelletized seeds, and it can be difficult with very large, hard seeds.
Next, choose clean, sterile pots or trays and sterile media. Seedlings are vulnerable to fungal disease at a very young stage and planting in sterile pots helps reduce the risk of fungal attacks. If you are reusing pots or trays from previous years, dip them in a 1:9 bleach to water solution for five minute or more to sterilize. Fill the trays once dry. Choose a sterile, pre-mixed fine germination media or make your own by thoroughly mixing of peat moss or fine particle pine bark, in equal part with perlite, vermiculite, or a combination of the two. Since most germination media is low in fertility, fertilize seedlings with a dilute soluble fertilizer or fish emulsion once they have grown “true” leaves. Full doses of fertilizer can burn seedlings. Apply one quarter to one half the recommended rate, every 7-10 days, while seedlings are small. If you purchase a seed starting mix with fertilizer, you may not need to fertilize seedlings. Do not add raw manure or young compost to media as they are not sterile and the ammonium in these can burn young seedlings.
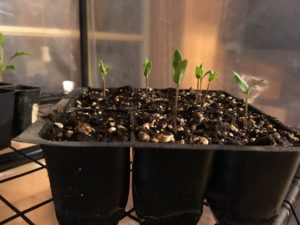
There are many different styles and sizes of seeding pots and trays. Keep in mind that if you are only going to grow your seedlings for 4 weeks before you transplant them, they might not need that much space in a tray. Fill each tray or cell near capacity with media, and wet the media before sowing seeds. Open trays or flats can hold many plants and allow roots to grow throughout the media, but require more care when transplanting as you must separate roots of individual plants. When using trays with individual cells, plant one to two seeds per cell. Cover each seed with a light layer of germination mix; approximately two to four times the diameter of the seed. Avoid sowing seeds that will be transplanted at different times in the same tray. One easy way to do this, if you plant small quantities of many different types of plants, is to utilize removable inserts, such as “6-packs”, within a larger tray.
Temperature, moisture, and lighting are important factors in seedling success. Many seeds germinate best between 65 and 85 F. Place trays on an electric germination mat for added warmth. It is critical to keep the media moist during germination. If possible, create a humid environment around the trays by placing in a germination tent or covering them with a clear plastic tray. Remove any plastic cover as soon as the first seed germinate. Seedlings should be kept between 60 to 70 F during the day and 55 and 60 F at night.
Check the seed packet for instructions on lighting.
Starting plants from seed is a fun gardening project that can be done before it is warm enough to plant outside.
Some seeds germinate best with light, while others require dark, and still others germinate in either condition. Once the seeds have germinated, place trays in a south-facing window or under fluorescent or appropriate LED grow lights, placed as directed by the specific light. Sow seeds only as early as needed ahead of transplant time. One problem that can occur if seedlings are started too early is that they become tall and spindly (or “leggy”) due to lack of light, even under grow lights.
The ideal time to transplant seedlings is two or three weeks after the first true leaves appear. Seedlings need to be hardened- or acclimated to cooler weather and outdoor conditions- before they are transplanted. This is especially important for early spring plants that will be transplanted during cooler days. Hardening is the process of gradually reducing the temperature and relative humidity around the seedlings, and should start two weeks before transplanting. To harden the plants, place them outside in protected areas for an increasing amount each day. Even for cold-hardy plants, do not begin to harden them on days when it is cooler than 45 F. Plants that are hardened too abruptly or severely can produce small fruit, or stop growing entirely.
Starting seeds is a fun spring garden task that helps get a jump on the season and saves money on transplant purchases. Children will enjoy tracking which seeds germinate first and grow most quickly. For specific questions on starting transplants or other garden information, contact Caldwell Cooperative Extension Center at 828-757-1290.